
In today’s blog story, you will enjoy learning the basics of image processing using Python. Image processing is a fundamental technique and introduction of artificial intelligence. We will use OpenCV, the library for image processing and manipulation, and Python generators for the steps of the pipeline.
We will use OpenCV for image processing and manipulation and Python generators for the steps of the pipeline.
Well, let’s first look at what’s our problem statement is. Guess, what’s the image?

You are right, it’s a typical picture of an open sky. I used to like watching and counting stars over the bright sky when I was a kid. I believe this will be a good exercise for you to dive into the image processing world.
#1 Import Libraries
Images basically enable us to do image processing using Python. Any image can be processed in which the language is extremely simple to understand but does some of the most complicated tasks. You’ll first need to have OpenCV. It is the essential library of image processing for beginners. However, there are also some libraries in which you can develop your code and might not use OpenCV but it’s not the scope of the blog today. You can use the libraries down here.
from matplotlib import pyplot as plt
from skimage import data
from skimage.feature import blob_dog, blob_log, blob_doh
from math import sqrt
from skimage.color import rgb2gray
import glob
from skimage.io import imread
#2 Import the Image
Once we have all the libraries in place, we need to import our image file to python. Following is the code you can use to import the image file. Note that the image is imported in greyscale, which basically means that each pixel is a shade of grey. And each pixel essentially becomes one cell in a matrix.
the_file = glob.glob(r"C:Users_sky.gif")[0]
im = imread(the_file, as_grey=True)
plt.imshow(im, cmap=cm.gray)
plt.show()

#3 Find the number of Stars
Here we come to the important part where our major labor is done by a few commands. We aim to count the number of the stars which goes out for searching continuous objects in the picture. Blobs_log gives three outputs for each object found. First two are the coordinates and the third one is the area of the object. The radius of each blob/object can be estimated using this column (area of the object).
blobs_log = blob_log(im, max_sigma=30, num_sigma=10, threshold=.1)
blobs_log[:, 2] = blobs_log[:, 2] * sqrt(2)
numrows = len(blobs_log)
print("Number of stars counted : " ,numrows)

As we can see that the algorithm has turned out estimated 308 visible stars. Let’s now look at how accurate are these readings.
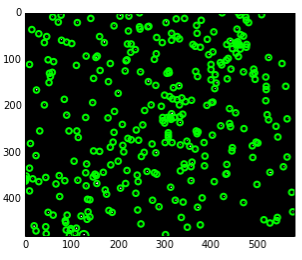
#4 Accuracy of the counted Stars
The algorithm has detected 308 stars in the image. However, we need to validate whether we captured all the stars. To do that, let’s circle each estimated star position. And the look at the image if we are missing any star.
fig, ax = plt.subplots(1, 1)
plt.imshow(im, cmap=cm.gray)
for blob in blobs_log:
    y, x, r = blob
    c = plt.Circle((x, y), r+5, color='lime', linewidth=2, fill=False)
    ax.add_patch(c)
# Conclusion
Well, we have accomplished to develop a simple image processing algorithm today. We have detected all the stars which we also checked the accuracy of the algorithm we developed so far.
An image processing pipeline is a set of tasks executed in a predefined sequence order to transform the image into the desired result or extract some interesting features.
Task examples could be:
- image transformations like translation, rotation, resizing, flipping and cropping,
- enhancement of the image,
- extraction of the region of interest (ROI),
- computing feature descriptors,
- image or object classification,
- object detection,
- image annotations for machine learning,
and many more.
Lastly, I want to remind you that we will soon take a look at further topics in image processing as we have discovered the beauty of object detection in today’s blog. Till then, I will be welcome to have your questions.