
Kotlin could be a language which will run on JVM. Google has declared Kotlin mutually of its formally supported programming languages in mechanical man Studio, and therefore the mechanical man community is migrating at a high pace from Java to Kotlin. During this Kotlin mechanical man Tutorial, I will tell you the way to form associate mechanical man Application victimisation Kotlin.
Below topics are coated during this article:
- What is Kotlin?
- Introduction to mechanical man
- Introduction to mechanical man Studio
- Creating a primary mechanical man Application victimisation Kotlin
Let’s get started!
What is Kotlin?
Kotlin could be a statically typewritten, all-purpose artificial language with kind abstract thought. It is widely used to develop Android applications. Kotlin is meant to interoperate absolutely with Java, and therefore the JVM version of its normal library depends on the Java category Library, however kind abstract thought permits its syntax to be a lot of telegraphic. Kotlin principally targets the JVM however conjointly compiles to JavaScript or native code. Kotlin is sponsored by JetBrains and Google, through the Kotlin Foundation. If you would like to grasp a lot of regarding Kotlin, you’ll be able to check with this text on Kotlin Tutorial.
Now let’s perceive the fundamental fundamentals of Android.
Introduction to Android
Android could be a mobile OS developed by Google. It’s supported the UNIX operating system kernel and designed primarily for touchscreen mobile devices like smartphones and tablets.

Android is the most productive and powerful mobile OS within the market these days.
Therefore before jumping into that, let’s 1st get a solution to why Android?
- Open-source
- Customizable OS
- Reduce the value of development and overall complexness
- Larger community and developer reach
- Inter-app integration
- Higher success quantitative relation
- Rich development surroundings – a spread of apps will be developed
You can learn a lot of regarding Android design and its options with the assistance of Android Tutorial. With this, let’s see a way to originated Android Studio on your system.
Introduction to Android Studio
Android studio is one among the official IDE (Integrated Development Environment) or tool) for developing an application for the Android platform. It’s a robust editor tool for developing inventive UI and emulators for various versions to check and simulate sensors while not having actual Android devices.
You can conjointly use IntelliJ to develop Android Application, however, Android Studio is a lot of appropriate for app development. Currently, let’s see a way to install it on your system.
- Step 1: Transfer Android Studio from this link.
- Step 2: Once it’s downloaded, then Open Android Studio and click on begin a replacement Android Studio project on the welcome screen or File | New | New project.
- Step 3: Choose an associate degree activity that defines the behaviour of your application. For your 1st application. choose Empty Activity that simply shows a screen, and click on Next.
- Step 4: Then, you would like to decide on the well-liked artificial language and hit the following button. If you would like to grasp a lot of regarding installation, kindly investigate this text on Android Studio Installation.
- Step 5: Once everything is about up, and your project is designed, your project structure seems like as shown below.
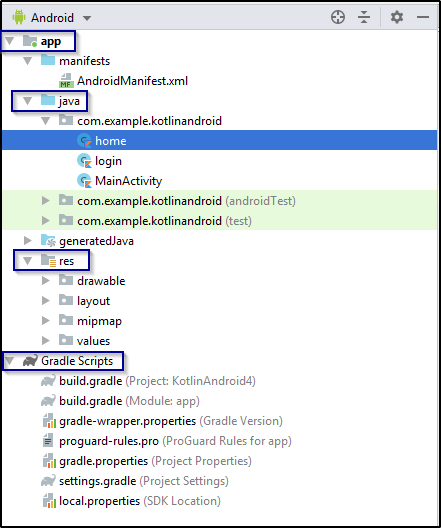
This is nothing however the anatomy of Android Application that includes of an app, Java, res and Gradle Scripts.
Now let’s write a program and build an easy login Android Application.
Creating a first Android Application using Kotlin
Here, I’m attending to produce a login Android application. Here, the primary screen is that the Welcome page as shown below.

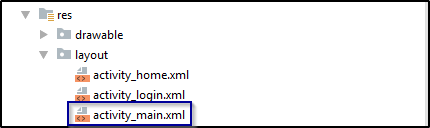
In order to make and style this screen, you would like to tack together your layout. For that, you would like to open the layout folder and double click activity_main.xml as shown below.
Once you open the XML file, you would like to make the weather supported the structure you would like your screen to appear like.
Before making the weather, I will open the planning tab and drag and drop the buttons onto my screen as shown below.
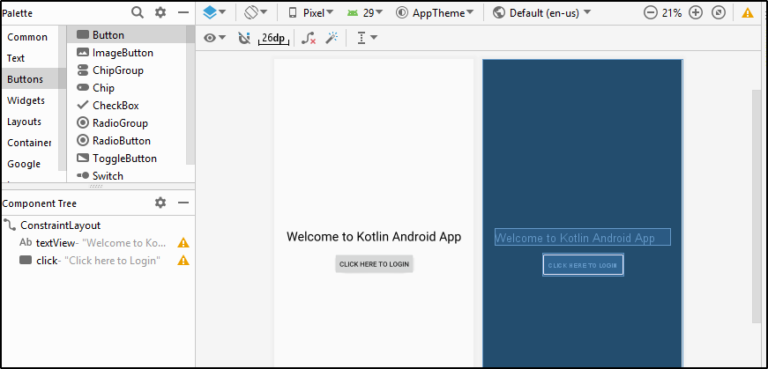
After this, I will return and tack together the activity_main.xml file and build all the weather. Your code looks like:
<?xml version="1.0" encoding="utf-8"?>
<androidx.constraintlayout.widget.ConstraintLayout
xmlns:android="<a href="http://schemas.android.com/apk/res/android">http://schemas.android.com/apk/res/android</a>"
xmlns:tools="<a href="http://schemas.android.com/tools">http://schemas.android.com/tools</a>"
xmlns:app="<a href="http://schemas.android.com/apk/res-auto">http://schemas.android.com/apk/res-auto</a>"
android:layout_width="match_parent"
android:layout_height="match_parent"
tools:context=".MainActivity">

<TextView
android:layout_width="wrap_content"
android:layout_height="wrap_content"
android:text="Welcome to Kotlin Android App"
android:textSize="26sp"
android:textColor="#000000"
app:layout_constraintBottom_toBottomOf="parent"
app:layout_constraintLeft_toLeftOf="parent"
app:layout_constraintRight_toRightOf="parent"
app:layout_constraintTop_toTopOf="parent" android:id="@+id/textView"/>
<Button
android:text="Click here to Login"
android:layout_width="wrap_content"
android:layout_height="wrap_content"
android:id="@+id/click" android:layout_marginTop="16dp"
app:layout_constraintTop_toBottomOf="@+id/textView" android:layout_marginEnd="96dp"
android:layout_marginRight="96dp" app:layout_constraintEnd_toEndOf="@+id/textView"/>

</androidx.constraintlayout.widget.ConstraintLayout>
Note: If Gradle project sync fails when the project is opened for the first time, click on the link Install missing platform(s) and sync project” in “Messages” window the missing components are downloaded and installed by Android Studio.
After this, you would like to make a Kotlin category file to feature the listeners for a job the actions from the XML file.
So here, I will be adding the listeners for job actions for buttons and therefore the text views that I even have created within the XML file.
package com.example.kotlinandroid

import android.content.Intent
import androidx.appcompat.app.AppCompatActivity
import android.os.Bundle
import android.widget.Button
import android.widget.Toast

class MainActivity : AppCompatActivity() {

override fun onCreate(savedInstanceState: Bundle?) {
super.onCreate(savedInstanceState)
setContentView(R.layout.activity_main)

val but_click=findViewById<Button>(R.id.click)
but_click.setOnClickListener{
val intent = Intent(this, login::class.java)
startActivity(intent)
}
}
}
With this, your 1st Welcome page screen is totally created. Next, you’ve got login screen wherever you would like to enter the email address and watchword and so hit the login button as shown within the below pic.
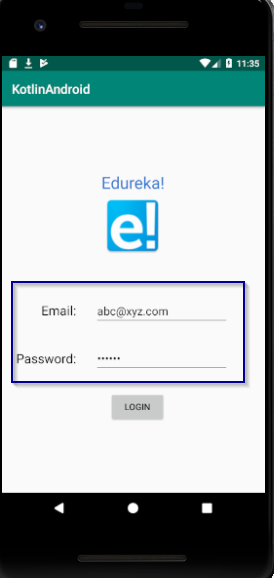
Now I will produce the planning in keeping with the on top of the image in my style Tab of second activity i.e activity_login.xml file as shown below.
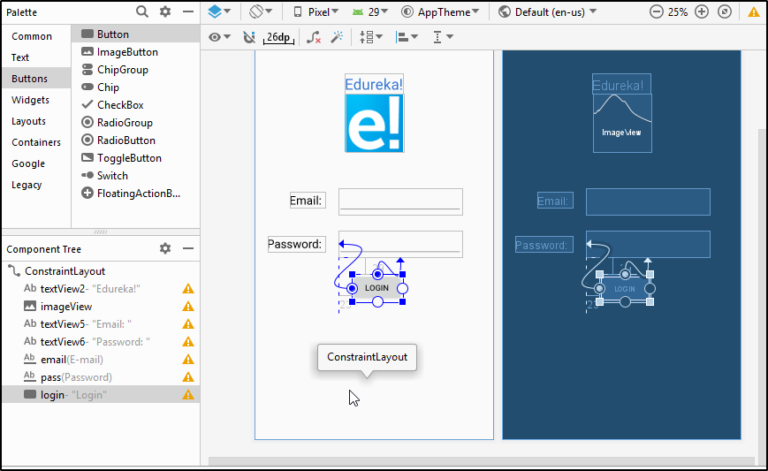
After this, I will tackle together with my XML file same as shown within the on top of the screen.
<?xml version="1.0" encoding="utf-8"?>
<androidx.constraintlayout.widget.ConstraintLayout
xmlns:android="<a href="http://schemas.android.com/apk/res/android">http://schemas.android.com/apk/res/android</a>"
xmlns:tools="<a href="http://schemas.android.com/tools">http://schemas.android.com/tools</a>"
xmlns:app="<a href="http://schemas.android.com/apk/res-auto">http://schemas.android.com/apk/res-auto</a>"
android:layout_width="match_parent"
android:layout_height="match_parent"
tools:context=".login">

<TextView
android:text="Edureka!"
android:textSize="26sp"
android:textColor="#3677d1"
android:layout_width="wrap_content"
android:layout_height="wrap_content"
android:id="@+id/textView2" app:layout_constraintTop_toTopOf="parent"
app:layout_constraintStart_toStartOf="parent" android:layout_marginTop="101dp"
app:layout_constraintEnd_toEndOf="parent"/>
<ImageView
android:layout_width="100sp"
android:layout_height="100sp" app:srcCompat="@mipmap/edureka"
android:id="@+id/imageView"
app:layout_constraintTop_toBottomOf="@+id/textView2"
app:layout_constraintEnd_toEndOf="@+id/textView2"/>
<TextView
android:text="Email: "
android:textSize="20sp"
android:textColor="#000000"
android:layout_width="wrap_content"
android:layout_height="wrap_content"
app:layout_constraintStart_toStartOf="parent" android:layout_marginTop="69dp"
android:layout_marginLeft="6dp" android:layout_marginStart="6dp"
app:layout_constraintTop_toBottomOf="@+id/imageView" android:id="@+id/textView5"
app:layout_constraintHorizontal_chainStyle="packed" app:layout_constraintEnd_toStartOf="@+id/email"
android:layout_marginEnd="24dp" android:layout_marginRight="24dp"/>
<TextView
android:text="Password: "
android:textSize="20sp"
android:textColor="#000000"
android:layout_width="wrap_content"
android:layout_height="wrap_content"
app:layout_constraintStart_toStartOf="parent" android:layout_marginTop="144dp"
android:layout_marginLeft="6dp" android:layout_marginStart="6dp"
app:layout_constraintTop_toBottomOf="@+id/imageView" android:id="@+id/textView6"
app:layout_constraintHorizontal_chainStyle="packed" app:layout_constraintEnd_toStartOf="@+id/pass"
android:layout_marginEnd="24dp" android:layout_marginRight="24dp"
app:layout_constraintHorizontal_bias="1.0"/>
<EditText
android:layout_width="wrap_content"
android:layout_height="wrap_content"
android:inputType="textEmailAddress"
android:ems="10"
android:id="@+id/email"
app:layout_constraintBaseline_toBaselineOf="@+id/textView5"
app:layout_constraintStart_toEndOf="@+id/textView5" app:layout_constraintEnd_toEndOf="parent"/>
<EditText
android:layout_width="wrap_content"
android:layout_height="wrap_content"
android:inputType="textPassword"
android:ems="10"
android:id="@+id/pass"
app:layout_constraintStart_toStartOf="@+id/email" android:layout_marginTop="29dp"
app:layout_constraintTop_toBottomOf="@+id/email"/>
<Button
android:text="Login"
android:layout_width="wrap_content"
android:layout_height="wrap_content"
android:id="@+id/login"
app:layout_constraintStart_toStartOf="@+id/pass" android:layout_marginTop="29dp"
android:layout_marginLeft="23dp" android:layout_marginStart="23dp"
app:layout_constraintTop_toBottomOf="@+id/pass"/>
</androidx.constraintlayout.widget.ConstraintLayout>
After this, you would like to make a Kotlin category file to feature the listeners for a job the actions from the XML file. So here, I will be adding the listeners for a job the actions for the e-mail and watchword field and conjointly for the buttons that I even have created within the XML file.
package com.example.kotlinandroid

import android.content.Intent
import androidx.appcompat.app.AppCompatActivity
import android.os.Bundle
import android.widget.Button
import android.widget.EditText
import android.widget.Toast

class login : AppCompatActivity() {

override fun onCreate(savedInstanceState: Bundle?) {
super.onCreate(savedInstanceState)
setContentView(R.layout.activity_login)
val email = findViewById(R.id.email) as EditText
val pass = findViewById(R.id.pass) as EditText

val btnLogin = findViewById(R.id.login) as Button
btnLogin.setOnClickListener {
//read value from EditText to a String variable
val ema: String = email.text.toString()
val pas: String = pass.text.toString()
//check if the EditText have values or not
if (ema.trim().length == 0) {
Toast.makeText(applicationContext, "Email field cannot be empty", Toast.LENGTH_SHORT).show()
}
if (pas.trim().length == 0) {
Toast.makeText(applicationContext, "Password field cannot be empty", Toast.LENGTH_SHORT).show()
}

if (ema.equals("[email protected]")&&(pas.equals("123456"))){
val intent = Intent(this, home::class.java)
startActivity(intent)
} else{
Toast.makeText(applicationContext, "Wrong Email or Password!!", Toast.LENGTH_SHORT).show()
}
}
}
}
Now you’re left with the last screen. that’s your home screen. Once you enter a valid username and watchword, you’ll be navigated through the following screen as shown below.
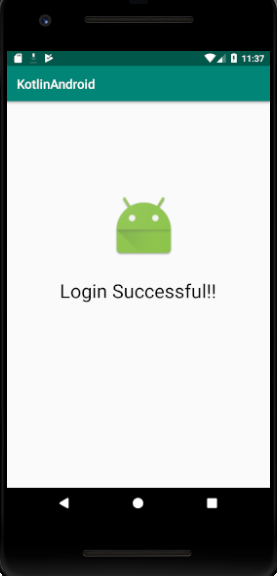
I have to take together this screen in addition. Currently, I will produce the planning in keeping with the on top of the image in my style Tab of second activity i.e activity_home.xml file as shown below.
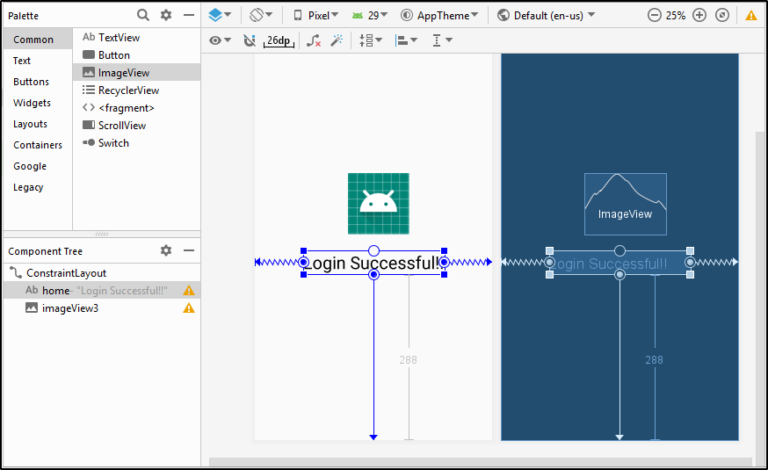
Let’s currently write the code for constant style created.
<?xml version="1.0" encoding="utf-8"?>
<androidx.constraintlayout.widget.ConstraintLayout
xmlns:android="<a href="http://schemas.android.com/apk/res/android">http://schemas.android.com/apk/res/android</a>"
xmlns:tools="<a href="http://schemas.android.com/tools">http://schemas.android.com/tools</a>"
xmlns:app="<a href="http://schemas.android.com/apk/res-auto">http://schemas.android.com/apk/res-auto</a>"
android:layout_width="match_parent"
android:layout_height="match_parent"
tools:context=".home">

<TextView
android:text="Login Successful!!"
android:textColor="#000000"
android:textSize="30sp"
android:layout_width="wrap_content"
android:layout_height="wrap_content"
android:id="@+id/home"
app:layout_constraintStart_toStartOf="parent"
app:layout_constraintEnd_toEndOf="parent" app:layout_constraintBottom_toBottomOf="parent"
android:layout_marginBottom="288dp"/>
<ImageView
android:layout_width="142dp"
android:layout_height="106dp" app:srcCompat="@android:drawable/sym_def_app_icon"
android:id="@+id/imageView3"
app:layout_constraintStart_toStartOf="@+id/home" android:layout_marginLeft="60dp"
android:layout_marginStart="60dp" android:layout_marginBottom="28dp"
app:layout_constraintBottom_toTopOf="@+id/home"/>
</androidx.constraintlayout.widget.ConstraintLayout>
After this, you would like to make a Kotlin category file to feature the listeners for a job the actions from the XML file.
So here, I will be adding the listeners for a job the actions for the text read and therefore the image that I even have created within the XML file.
package com.example.kotlinandroid

import androidx.appcompat.app.AppCompatActivity
import android.os.Bundle
class home : AppCompatActivity() {
override fun onCreate(savedInstanceState: Bundle?) {
super.onCreate(savedInstanceState)
setContentView(R.layout.activity_home)
}
}
After configuring all the three screens you’ve got to ascertain for Gradle build and run the project. After you do, therefore, it’ll raise you to decide on the virtual device and you would like to choose the one that you wish and run the code. Your 1st mobile application is launched.
That’s however you would like to make your 1st Android Application victimization Kotlin artificial language. If you would like to grasp the basics of Android, then kindly check this text on Android Tutorial.
This brings the United States of America to the tip of this text on Kotlin Android Tutorial. Hope you’re clear with all that has been shared with you during this article.
Now that you simply have knowledgeable our Kotlin Android Tutorial. You’ll be able to investigate Edureka’s Android App Development Certification coaching Got a matter for us? Please mention it within the comments below and that we can come back to you.