
Today, we will look forward to learn editing screen in Pyxel. Shall we start?
-Primary Color
Shortcut secret is C>/b>. the color during this primary color box is the color that each one your tools will use. If you use the bucket tool or draw with the pencil this can be the color that you’ll get.
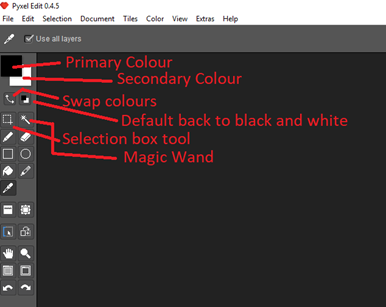
-Secondary Color
The second color is drawn on for under a number of the tools, as an example, the color replacer tool. the color replacer tool will replace the color within the secondary color box with the color within the primary color box. Additionally, it is useful to stay a second color you are using to simply flick back and forth between them.
-Swap
Shortcut secret is X. This tool swaps the first and second colors. Therefore the secondary color becomes the first color when this tool is used.
-Default colors
This tool can reset your primary and secondary colors back to Black and White.
-Selection Tool
Shortcut secret is S. Hold Shift to feature to your selection. Hold Alt to get rid of bits from your selection. If you hold Ctrl and drag you will be able to transform the choice or Alt-drag to remodel a copy of the choice. You will be able to drag the selection to maneuver it or double click to pick the complete tile.
Magic Wand: Shortcut secret is W. The wand is drawn on to pick an oddly shaped section. Click on the bit you would like to pick with the magic wand and it ought to select specifically that shape.
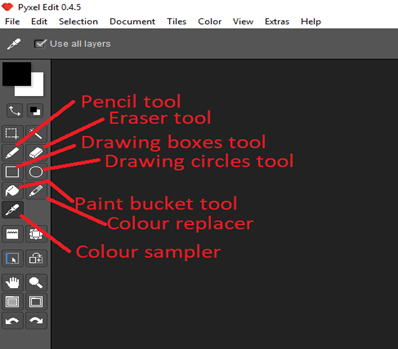
-Pen/Pencil
Shortcut secret is D. The Pen is what you draw with. You will be able to use it to draw freehand, otherwise, you can hold Shift to create straight lines. You will be able to also hold Shift and Ctrl to create isometric lines. Holding Ctrl and Alt and drag to vary the comb size. The first color is the color utilized by the Pen tool.
-Eraser
Shortcut secret is E. This can be the tool to delete/erase pixels. Hold the Shift to erase in straight lines. Hold Ctrl and Alt and drag to vary the eraser brush size. It’s used equally to the Pen tool, however, it removes pixels rather than drawing them.
-Bucket
Shortcut secret is F. This tool fills a whole area with the first color. The world will need an unbroken border otherwise you might fill the complete image with the first color. Holding Ctrl can fill that area with transparency rather than a color, and holding Shift can fill outside the tile bounds.. ie, multiple tiles.
-Color Replacer
Shortcut secret is K. This tool is comparable to the Pen tool, except it does not draw any new pixels. Instead it takes pixels that are identical because of the secondary color and replaces that color with the first color.
-Color Picker/Sampler
The shortcut secret is Alt. This tool is employed most when creating pixel art. Especially when the artist is attempting to urge all the pixels specifically right. Using the shortcut key saves plenty of your time. Click the color picker on any modify your work which color will then become the first color.
-Tile Placer Tool
Shortcut secret is A. This tool is incredibly useful during animating. Right-click with this tool to repeat a tile. So you will automatically paste into the other tile that you simply normally click. Ctrl-click to create a brand new title from the canvas. Shift-click to erase a tile from the canvas. Additionally, this tool has more advanced uses. Ctrl-right click to unmap a tile within the canvas and if you Shift-right click you will be able to place an identical to the present tile. Without these functions, animation becomes time-consuming as you are attempting to repeat and paste your pixels within the exact right position. This too automatically l does it.
-Offset Tool
Shortcut secret is O. This tool offsets the contents among a tile. This implies you will be able to move your pixels around in one tile without affecting any of the others. And with no need to pick your tile by double-clicking or by using the choice tool.
–Animation Frame Range Tool
This tool sets the beginning and therefore the end frames of animations. You would possibly have twelve tiles in your document, however, the highest four are an idling animation, the second four are a walking animation and therefore the last 4 are a running animation. You would use this tool to precisely set which tile belonged to which animation. Left-click to line the beginning frame. Right-click to line the tip frame. Click and drag to line the total range.
-Animation Frame Manager Tool
This tool helps you to repeat, paste, insert or delete animation frames. This tool includes the content of all layers. Left-click a frame to switch it. Right-click a frame to select it. Left-click a grip to insert the frame and right-click a grip to chop that frame out.
-Pan Tool
Shortcut secret is Space. this protects most time, as you’ll be able to quickly go searching your work by holding the spacebar while you zip around gazing the assorted sections and tiles of your document.
-Zoom Tool
The shortcut secret is Z. Center to work out your add greater detail. You will be able to also use the scroll wheel on your mouse if you have got one. Another huge time-saver.
–Zoom to suit Image
The shortcut secret is 0. That shortcut secret is a zero instead of the letter O. This key quickly zooms bent on the foremost pleasing full fit of your image and centers it.
-Maximize / Center Frame
This tool is beneficial if you are engaged in multiple documents at a similar time. It opens your other documents into different windows/panels rather than your documents being full-sized on different tabs.
-Undo
The shortcut secret is Ctrl + Z. Undoes the last action. Unlike Photoshop, this program does not have a history panel. Therefore this tool becomes essential.
-Redo
The shortcut secret is Ctrl + Y. Redoes the last action that was undone.
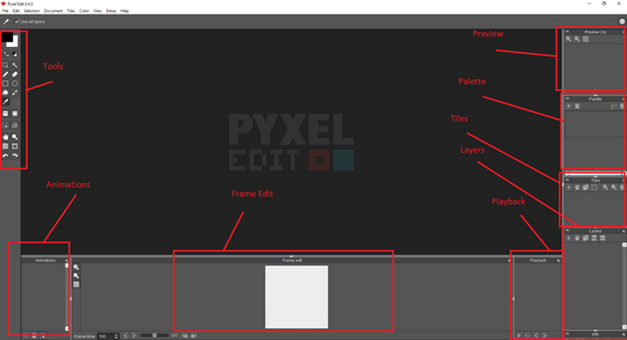
And the other panels other than tools Just in case you forgot:
– Animations
This section allows you to feature animations to your art. You will be able to add multiple animations. You would possibly have an animation for walking, however a distinct animation for running. This can be useful since you will be able to use many of the similar layers with each animation.
You can additionally control the animation speed, and that tiles are included during which animations.
– Frame Edit
Shows the present frame and you will be able to draw directly during this panel. This helps with making to line up sprites in your animation. Especially since within the main window the tiles are side-by-side so it is often hard to inform if you are engaged on the precise same pixel in each tile.
– Playback
This bit is super helpful, it is a pulled back version of your document. Therefore you will be able to instantly see how the animation is moving and helps you to realize where pixels are not quite working. It additionally shows you your image during a single tile view. This is helpful when you have got twenty-four tiles going and also the screen looks confusing.
– Layers
Think of layers like panes of glass. You will be able to draw a picture on one pane, and a distinct image on another pane, but once you put one in each of those panes directly behind the opposite, it quite seems like one image. Layers are particularly helpful in the animation of pixel art. You would possibly place each arm, each leg, and also the head on a separate layer so as you animate you will be able to move them individual basis.
– Tiles
Tiles may be the animation frames, or they will be parts of a bigger image. This panel allows you to feature, delete, and edit Tiles as needed.
– Palette
This is where you add in colors that you simply reuse often. You have got access to any or all the potential colors within the Tools menu, but this palette enables you to save your favorite colors.
– Preview
It gives you a touch window into how the total image looks. You spent plenty of your time zooming in and out then this preview window can prevent great of your time.